Deploy Flask RESTFUL API on AWS EC2 server using PUTTY
Follow this simple steps to follow to deploy flask RESTFUL API on AWS EC2 server:
1) Create an EC2 instance on AWS:
Select the EC2 instance and proceed forward.
2) Select the General Purpose t2.micro Free tier eligible Instance.
3) In next steps you don't have to do much just keep on moving ahead. Next step would be to add storage.
4) Create a new key pair and download it.
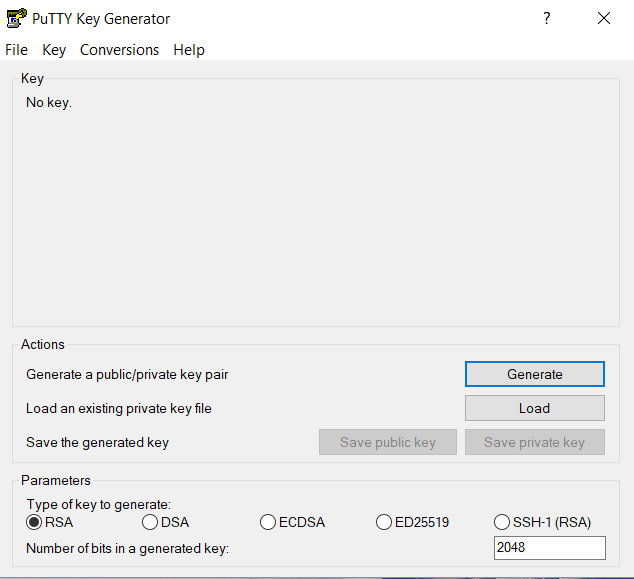
5) Hit Launch Instance. Give it few seconds to launch. Then open PUTTYgen from START.
6) Click Load then browse the key pair, select it and click on Open .
7) Then save the private key to the same Folder location and click Yes and save the private key.
8) Close PuTTYgen then copy the Public DNS address from the EC2 instance.
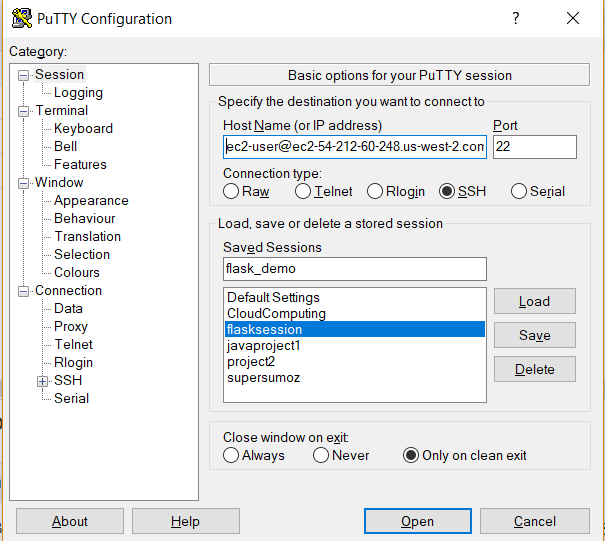
9) Open Putty then type ec2-user@ in the Host Name and the Public DNS address to it.
10) In the Saved Sessions you can add a name to save the session. Just type in the Saved Sessions the desired name -> on the left side of PuTTY go through Connection -> SSH -> Auth.
Click Browse then search for the saved ppk file i.e private key.
11) Then go back to Sessions and click on Save and then Click Open. If you don't want to save the session then you can just go ahead and click open when you are inside SSH-> Auth.
Click Yes and then you will be logged in PuTTY using the running EC2 instance.
Now Follow these commands to deploy your Flask Project on EC2 instance.
1) Update the instance with the command:
[ec2-user@ip-172-31-20-251 ~]$ sudo yum update
2) Update the Pip.
[ec2-user@ip-172-31-20-251 ~]$ pip install --upgrade pip
3) Install the Flask.
[ec2-user@ip-172-31-20-251 ~]$ sudo pip install Flask
4) Create a Folder app
[ec2-user@ip-172-31-20-251 ~]$ mkdir -p app
5) Traverse inside the app folder using command:
[ec2-user@ip-172-31-20-251 ~]$ cd app
6) Make a folder named static
[ec2-user@ip-172-31-20-251 app]$ mkdir static
7) Make a folder named templates
[ec2-user@ip-172-31-20-251 app]$ mkdir templates
8) Create a Python file from where the project will be executed. In my case it is flask_cloud.py
[ec2-user@ip-172-31-20-251 app]$ vim flask_cloud.py
Steps to add the code:
1) Press i then it will allow you to insert the code. Then you can type in the code or just copy paste the code.
2) After you are done typing the python code then press Esc and type :wq and hit Enter
3) To check whether or not changes have been made to the file then again run the command.
[ec2-user@ip-172-31-20-251 app]$ vim flask_cloud.py
9) Now to add the HTML code go into the templates folder.
[ec2-user@ip-172-31-20-251 app]$ cd templates
10) Repeat the same procedure to add the code.
[ec2-user@ip-172-31-20-251 templates]$ vim index.html
11) Come out of the templates folder and then go into static folder to add the any CSS file.
[ec2-user@ip-172-31-20-251 templates]$ cd ..
[ec2-user@ip-172-31-20-251 app]$ cd static
[ec2-user@ip-172-31-20-251 static]$ vim style.css
12) Come out of the static folder and run the following commands to deploy your application on EC2
[ec2-user@ip-172-31-20-251 static]$ cd ..
[ec2-user@ip-172-31-20-251 app]$ export
FLASK_APP=flask_cloud.py
[ec2-user@ip-172-31-20-251 app]$ flask run --host='0.0.0.0'
* Serving Flask app
"flask_cloud.py"
* Environment:
production
WARNING: Do not use
the development server in a production environment.
Use a production
WSGI server instead.
* Debug mode: off
* Running on
http://0.0.0.0:5000/ (Press CTRL+C to quit)
Next step would to copy the DNS name and paste it on to the web browser and add :5000 to see your Flask application up and running.
ec2-54-186-40-227.us-west-2.compute.amazonaws.com:5000
Next we will see the steps to deploy Flask restful api on Docker and how to pull the Docker image and then execute it on the EC2 instance.


Nice post. Keep sharing . more and more SEO Training
ReplyDeleteJava Training
python Training
Salesforce Training
Tableau Training
AWS training
Dot Net Training
DevOps Training
Selenium Training